
For a long time I have been following the website/project MySensors.org. I’ve been thinking about building a temperature and humidity sensor-network in my house for a long time and this project seems to have figured out all the hard stuff (radio communication, low-power battery sensors, network gateway and even controllers).
The Getting Started guide on MySensors.org is a really great starting point to read about the MySensors project and see what it can do.
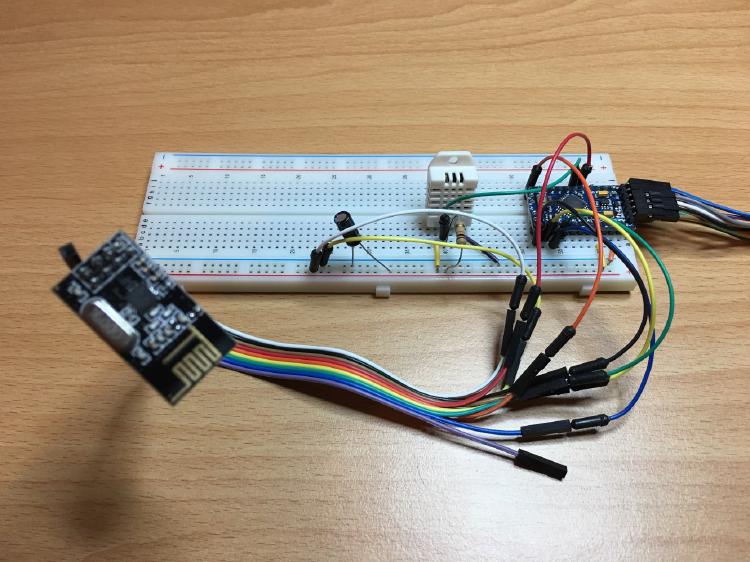
For my first project I used the following hardware:
- ESP8266 NodeMcu v0.9
- Arduino Pro Mini 3.3v (ATMEGA328 at 8 MHz)
- NRF24L01+ (2 pieces)
- AM2302/DHT22
- FTDI USB 3.3v programmer
I setup the ESP8266 as an WiFi gateway, the only thing I added was an extra 22µF capacitor between the ground and the power of the NRF24L01 as described here under Connecting a Decoupling-Capacitor.
With the Arduino Pro Mini I created a temperature and humidity sensing node. When I started building this node, the MySensors-website contained an old version of the code that was not compatible with the latest (2.0) version of the MySensors-library. So I ended up changing the code and fixing a couple of problems. I was planning on writing down all the steps that I took, until I discovered that Henrik Ekblad created a new version of the code with the exact same fixes. So if you go to Air Humidity Sensor page right now, you will have a working node in minutes (mine took an evening of tinkering).
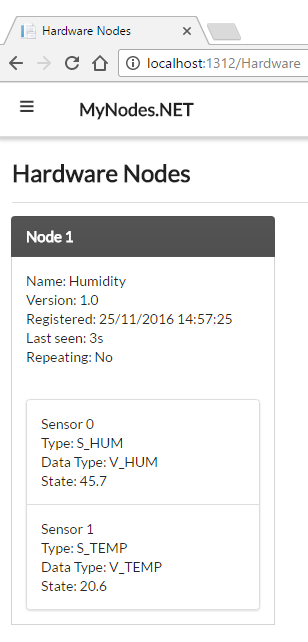
After creating the gateway and the humidity-node, I needed a (what MySensors calls) Controller. Since I’m doing all my work on a Windows machine and my day-job is a .NET Developer, I went for MyNodes.NET. After starting the software (with localhost.cmd run as administrator) and opened a browser to http://localhost:1312, all I needed to do was add the ip-address of the gateway in the configuration-section and when it was connected, the temperature & humidity node appeared!
This was just my first step at creating a sensor network for my house. It only proves that the MySensors library is a very good fit for the sensors I’m planning on creating. The next step will be to convert the gateway to a MQTT gateway and use a different controller that supports more hardware and has a larger (more active) community (most likely it’s going to be Domoticz).
4 replies on “Getting started with MySensors”
Very nice… I haven’t tried MyNodes.NET yet, but looks quite nice! I’m testing some new boards I got https://talk2.wisen.com.au/product-talk2-whisper-node-avr/ but apparently the software only support NRF24… hopefully they’ll support RFM69 soon.
Looks like a very nice board! MySensors seems to support the RFM69 radios: https://www.mysensors.org/build/connect_radio
But I haven’t tried this myself. MyNodes.NET doesn’t care which radio you use, as long as it has a gateway it can talk to.
Nice! Too bad that hardware is so expensive! … NOT! :-P
Did you know that NRF24L01 can connect with 6 (or was it 5?) other NRF24L01’s? Is that how you are going to link up extra temp/humid nodes?
Greets Marc
I did know the NRF24L01+ has support for multiple pipes (on the same channel). The MySensors-library I’m using abstracts this away for me. Currently the library is using 2 pipes (as of release 2.0) for listening, one for broadcasts and one for direct communication. The MySensors library supports 254 nodes on a single channel, as long as the sensors aren’t all transmitting at the same time. Since room temperature and humidity is a slow changing process, transmitting once every 5 to 10 minutes should be enough. And when 2 nodes still want to transmit at the same time, they have the ability to ask for an acknowledgment from the controller, so they know when they need to retransmit their data. This is exactly why I’m currently using this library, someone has actually thought of and solved these problems!
Your reply